WPNinjas HeaderWPNinjas Header

Extending Microsoft Sentinel with important device data

During security Incident Analysis, Threat and Vulnerability Management and security activities it’s important to have enough data available to correlate them. 

Especially Microsoft Intune contains a lot of valuable information, but also other resources which are available via Microsoft Graph can be helpful. It is simple to add this information to Microsoft Sentinel with Azure Logic Apps. In this blog I explain how this can be achieved.

Define the required data

The first and most important task is to define which information you would like to have available within Microsoft Sentinel. We collected a few samples  (Thanks to @Chris) which could be helpful:

As soon you have defined your wishes you have to research the Microsoft Graph Documentation to figure out which endpoints we will require and which Scopes (Permissions) are required to access them. On the pages you find the scopes from least to most privileged in the first table. As we are using a Managed Identity we have to use the one from the Application row.

According to my wishes we require the following:

PathMinimum Scope
/v1.0/devicesDevice.Read.All
/v1.0/devices/%ID%/transitiveMemberOfDirectory.Read.All
/v1.0/devices/%ID%/registeredUsersDevice.Read.All
/beta/deviceManagement/managedDevicesDeviceManagementManagedDevices.Read.All

Create Logic Apps

To simplify the process I have created multiple Logic Apps, one per custom table. The first in my example, I will name it la-ExtendedDeviceInfo is responsible to import Azure AD Device data enriched with Intune information. Overall the flow consist of the following phases:

  1. Trigger
  2. Variable Initialization
  3. Request all Azure AD devices
  4. Request additional data per device and submit it to LogAnalytics.

Requesting data from the Graph API could be done via the Managed Identity of the Logic App itself. 

But keep in mind that Graph will only return a specific amount of rows and you have to loop through all the pages as soon you could imagine that you will exceed the page size. For Azure AD devices the default page size is 100 and therefore it could be reached soon.

More information regarding paging can be found on Microsoft Learn. In a LogicApp you have to use multiple steps to implement the correct behaviour:

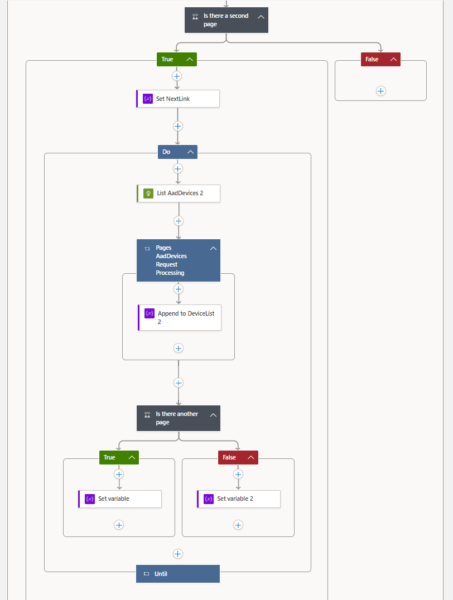
The most simple option to deploy the LogicApp in your environment is via the Deploy to Azure Button or by using the bicep file from Github.


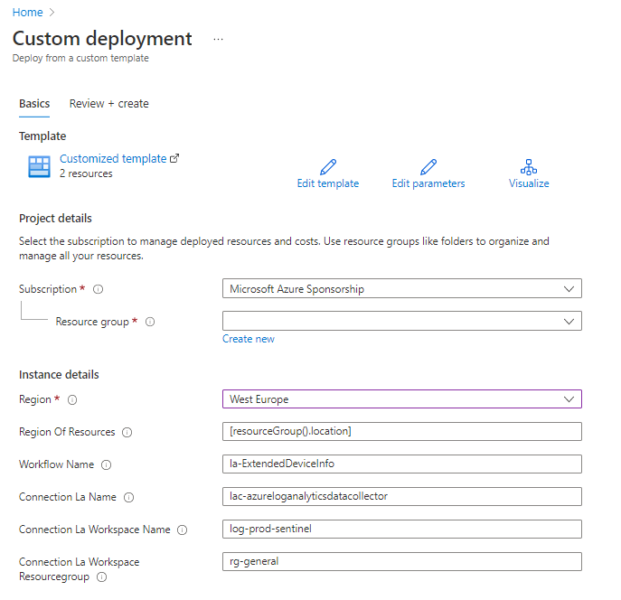
In the deployment wizard you have to provide several values for the parameters.

The “Workflow Name” and “Connection La Name” should contain the wished name of the created resources according to your naming concept. The most important parameters are:

  1. Connection La Workspace Name: This needs to be the exact name of the Log Analytics workspace where you want the data saved in. It can be in another resource group but has to be in the same subscription.
  2. Connection La Workspace Resource group: This needs to be the name of the resource group where the Log Analytics account belongs to.

You can continue to the next step and granting the right permissions as soon the deployment is successfully completed.

Granting Permission to Managed Identity

It is currently not possible to grant permission to Managed Identities via UI and therefore we need to use PowerShell Script. 

You have to provide the name of the Logic App which you provided in the step before to the Parameter “Workflow Name” and add it on line two of the following script.

You can remove line 12 if you have the Azure AD Module already preinstalled. Afterwards you can just execute the script and logon with Global Admin Privileges.

$GraphAppId = "00000003-0000-0000-c000-000000000000"
$DisplayNameOfMSI="Provide the Logic App name"

$PermissionName = @(
    "Directory.Read.All",
    "DeviceManagementManagedDevices.Read.All",
    "DeviceManagementConfiguration.Read.All"
    )


# Install the module
Install-Module AzureAD


Connect-AzureAD 

$MSI = (Get-AzureADServicePrincipal -Filter "displayName eq '$DisplayNameOfMSI'")

Start-Sleep -Seconds 10

$GraphServicePrincipal = Get-AzureADServicePrincipal -Filter "appId eq '$GraphAppId'"

# Request the required roles
$AppRoles = $GraphServicePrincipal.AppRoles | Where-Object { $_.Value -in $PermissionName -and $_.AllowedMemberTypes -contains "Application"}

# Add the roles to the MSI
foreach($AppRole in $AppRoles){
    New-AzureAdServiceAppRoleAssignment -ObjectId $MSI.ObjectId -PrincipalId $MSI.ObjectId -ResourceId $GraphServicePrincipal.ObjectId -Id $AppRole.Id
}

Testing and Result

As soon the permissions are granted you should be able to execute the LogicApp with a click on Run Trigger > Run

As soon the run status changes to succeeded in the run history you can go to you LogAnalytics workspace and check f the new table is created and if data is available. This can take up to a few minutes. 

With the following KQL query you will only get the latest entry per device:

ExtendedDeviceInfo_CL 
    | summarize arg_max(TimeGenerated,*) by AadDeviceId_g

You can now use this information for example to do cross checks and for example retrieve the Intune owner of a specific device and compare it with the MDE last logged on user.

ExtendedDeviceInfo_CL 
    | summarize arg_max(TimeGenerated,*) by AadDeviceId_g 
    | project AadDeviceId_g,DeviceUsers = extractjson("$[0].userPrincipalName",DeviceUsers_s,typeof(string))
    | join kind=leftouter DeviceInfo on $left.AadDeviceId_g == $right.AadDeviceId
    | project DeviceName,AadDeviceId_g,DeviceUsers,LoggedOnUsers

I hope this information is also valuable for your environment. Stay tuned, more extensions will follow.

Follow me

0 Comments

Leave a Reply

Avatar placeholder

Your email address will not be published. Required fields are marked *

This site uses Akismet to reduce spam. Learn how your comment data is processed.